CareerCross uses cookies to enhance your experience on our websites. If you continue to view our sites without changing your browser settings, then it is assumed that we have your consent to collect and utilise your cookies. If you do not want to give us your consent, then please change the cookie settings on your browser. Please refer to our privacy policy for more information.
CareerCross uses cookies to enhance your experience on our websites. If you continue to view our sites without changing your browser settings, then it is assumed that we have your consent to collect and utilise your cookies. If you do not want to give us your consent, then please change the cookie settings on your browser. Please refer to our privacy policy for more information.
Manage Sub-Accounts
What is a Sub-Account?
A Sub-Account is a separate account within your CareerCross account. You can create a Sub-Account for one or more departments within your organization. It was designed to support organizations with several internal departments to better manage their recruitment needs. For each Sub-Account, a unique ID and password is required. A Sub-Account’s allowed number of jobs, scout emails, text-ads, and resume agents is controlled by the Master Account. The Master Account acts as the administrator for the group of Sub-Accounts and can freely allocate or re-allocate the amount of available services for each Sub-Account.
Why Use a Sub-Account?
A Sub-Account is particularly useful for larger companies with multiple divisions or subsidiaries. Each division can be allocated its own Sub-Account, which in turn can be responsible for managing its own recruiting needs. These Sub-Accounts can be completely tailored to suit each division’s recruiting needs at any time.1. Adding a Sub-Account (Master Account Only)
When logged in to the master account, please go to the “Sub-Accounts” page and click “Add Sub-Account”. On the following page, enter a username and a password for the Sub-Account. You can allocate a portion of your own contract to each Sub-Account. Please select the number of jobs, scout emails, text ads, and resume agents you would like to allocate to this Sub-Account and click “Save”.2. Edit and Manage Product Limits (Master account only)
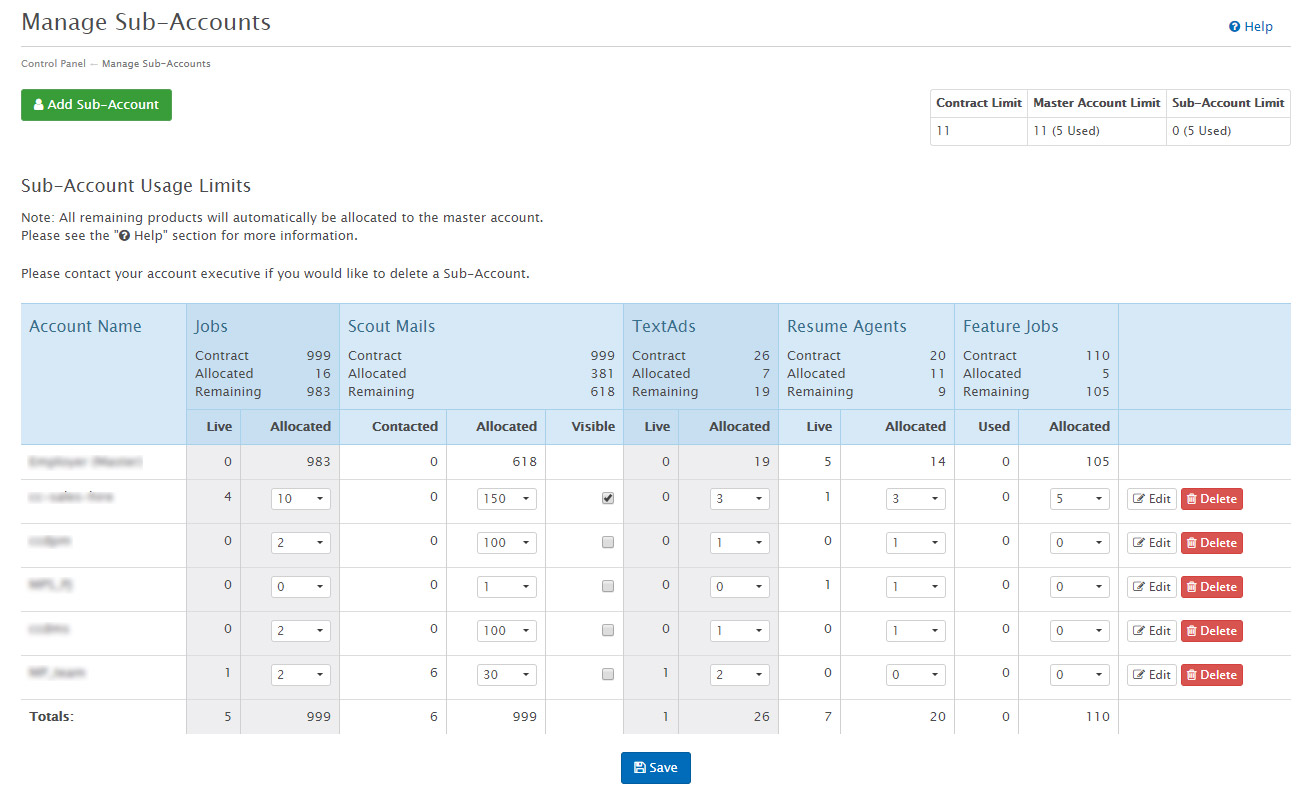
Each Sub-Account is managed in the “Sub-Accounts” section in the Control Panel of the Master Account. All Sub-Accounts are listed in the “Account Name” column. Each Sub-Account’s product limits are represented in the table. Figures in pull-down menus represent the allocated number of products per Sub-Account. To change multiple accounts, simply select a new number from the pull down menu and click “Save”. To change a password, please click “Edit” on the right of each account.
In addition, if "Visible" is checked in the Scout Mails section, it means users of other Sub-Accounts can also view scout messages that were sent from the account. In the case you choose not to share scout mails between accounts, there is a possibility for the same candidate to be contacted by multiple sub-accounts.
3. A Note Regarding Scout Emails
Each Sub-Account can have limited privacy regarding scout emails. If you would like to share this Sub-Accounts scout email information with other Sub-Accounts, please check the “Visible” checkbox. Leave the box unchecked if you would like each Sub-Account’s scout email information to be hidden. Please note that by hiding scout emails, your company runs the risk of contacting the same candidate multiple times from different Sub-Accounts.4. Deleting a Sub-Account
To delete a Sub-Account, click the "Delete" link next to the account you would like to delete. A warning message will appear asking you if you are sure. Click "OK" to continue or "Cancel" to cancel the action. All applications and contacts will be moved under the Master Account, so please delete any unnecessary applications and contacts before deleting the Sub-Account. Any products that have been allocated to this Sub-Account will be re-allocated to the Master Account after deletion.Manage Sub-Accounts
